
Working with Items
- 冊子目録オペレーター
- 冊子目録オペレーター(拡張)(削除操作に必要)
Users with these roles can work with physical resources only within the scope defined for the role in the User Details page, see Managing User Roles.
You create, edit, and delete physical resources — inventory that corresponds to physical items in your library — using various editors and jobs.
クイック目録を使用すると、冊子を目録に追加できます。次のタイプのアイテムを追加できます。
- Items for existing titles (add inventory to an existing holdings record) — Adding a Physical Item to an Existing Title
- New items (add inventory together with new holdings and bibliographic records) — Adding a New Book or Journal Article
For more information, watch Purchasing Physical Items.(7分27秒)
次の要約は、このページで説明されているセクションへの (関連するタスクの) クイック リファレンスを示しています。
- Resources > Add Physical Item — Libraries that have bibliographic and holdings records for a title need only to add a new item (new inventory), see Adding a Physical Item.
- Via New Metadata Editor — When editing a holdings record, add inventory, see Adding a New Book or Journal Article.In addition, see Navigating the New Metadata Editor Page and Add Item for more information.
- Working with the List of Items- The List of Items page lists physical items related to a physical title.
- Via a Repository Import Profile - Import items using an Excel or XML file that contains a list of items.See Managing Import Profiles.
- Import items via an API - For that, your institution would need to write an application that creates/updates the items with the API.
既存のタイトルへの冊子の追加
図書館に既存のタイトルの書誌および所蔵レコードがあり、新しいアイテム(新しい目録)を追加するだけでいい場合、[クイック目録]を使用して新しいアイテムを追加できます。You must know the item's barcode to complete this procedure.
There is no limitation on the number of physical item records that could be added to an existing title.
- [所蔵タイプの選択]ダイアログボックス([リソース > 目録の作成 > 冊子を追加])から、[既存]オプションを選択し、[選択]を選択します。既存のリソースの[クイック目録]ページが表示されます。
- リソース情報セクションで、アイテムのタイトルを見つけます。
- タイトルを選択すると、[タイトル]フィールドに選択内容が表示されます。[図書館]および[ロケーション]フィールドは、[タイトル]の選択に基づいて表示されます。
- アイテムのバーコードを入力し、オプションで次のパラメーターを追加します。
- Use item template- Enables users to select a template to use in the Add Physical Item quick cataloging form, that automatically populates the item created by that form with the template's data.Use the magnifying glass drop-down menu or the find (arrow) icon to select from Recently Used,My Templates(Private), or Public templates.The template will encompass all the item's details except for Barcode, Inventory number, Pattern information, Process type, At (request department), Item call number prefix/suffix, and Temporary call number prefix.Watch the Item Templates video (3:23 mins).
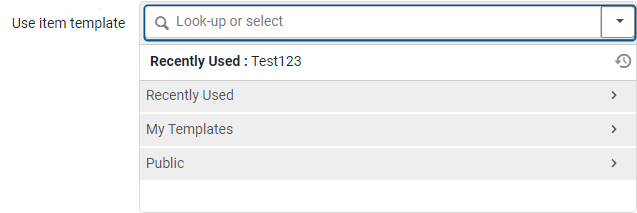 アイテムテンプレートの使用ドロップメニュー
- Description— The text you enter appears in the list of holdings for the item (see Working with the List of Holdings).
- Material Type— Use the magnifying glass drop-down menu or the find (arrow) icon to find and select a value for Material Type.The material type appears only in Primo's Get It and Details tabs.For information on customizing the labels of the material types, refer to Configuring Physical Item Material Type Descriptions.
- Item Policy— Use the magnifying glass drop-down menu or the find (arrow) icon to find and select a value for Item policy.
- Public Note— Optional.
- Use item template- Enables users to select a template to use in the Add Physical Item quick cataloging form, that automatically populates the item created by that form with the template's data.Use the magnifying glass drop-down menu or the find (arrow) icon to select from Recently Used,My Templates(Private), or Public templates.The template will encompass all the item's details except for Barcode, Inventory number, Pattern information, Process type, At (request department), Item call number prefix/suffix, and Temporary call number prefix.
- [保存]を選択します。アイテムが目録に追加されます。You are returned to the Alma home page.RFIDとアクティブなRFID接続がある場所の場合、[RFIDへの書き込みと保存]の追加オプションがあります。When the information has successfully been written to the RFID, the information is saved to the Alma database.For additional information, see RFID Support.If you only want to update information in the Alma database, select Save.
新しい書籍または雑誌記事の追加
新しい書誌および所蔵レコードとともに新しいアイテムを追加できます。
-
[所蔵タイプの選択]ダイアログボックス([リソース > 目録の作成 > 冊子を追加])から、[新規]オプションを選択します。
-
Select the Citation Type(Book or Article) and select Choose.[クイック目録]フォームが表示されます。書籍とジャーナルのエントリのパラメータは異なります。
-
以下の表を使用して、書籍または記事のリソース情報フィールドに値を入力します。記載されている場合、一部のパラメータは書籍または記事にのみ関連します。さらに、パラメータの順序は、書籍と記事で異なります。
クイック目録フォームによって作成されたすべての簡単な書誌レコードには、物理的資料または電子資料であるかどうかによって「決定」されるLDRおよび008フィールドがあります。- すべての物理的資料は、書籍として目録化されています。
- すべての電子資料は、継続的なリソースとして目録化されています。
リソース情報フィールド フィールド 説明 タイトル/記事/章のタイトル (必須) 本、記事、または章のタイトル ジャーナルタイトル(記事) 記事を含むジャーナルのタイトル 著者 本または記事の著者 著者のイニシャル The author's initials 版(本) 本の版数 巻 本またはその記事を含むジャーナルの巻数 発行(記事) 記事を含むジャーナルの発行番号 ISBN/ISSN 書籍または記事を識別する国際標準図書番号(ISBN)または国際標準逐次刊行物番号(ISSN) LCCN 議会図書館管理番号 システムコントロール番号 Online Computer Library Center(OCLC)番号などの中央識別子番号 その他の標準ID このフィールドのこの値は、MDエディタの024$$aフィールドとしてセットされます。 バーコード このフィールドはリソース共有の目的で使用されます。 貸出リスエスト作成では、アイテムセクションは存在しません。ただし、借出側が貸出側のバーコードを知っている場合(たとえば、ネットワークや外部ブローカー)、このフィールドに入力され、「配置」はこのフィールドに基づいて行われます。
リモートレコードID MMS ID 発行者 本またはジャーナルのこの版の出版社 発行日 Date of the book or article's publication DOI(記事) アイテムのデジタルオブジェクト識別子 PMID(記事) PubMedデータベースID 出版地 本または記事が発行された場所 追加者名 追加の連絡先の名前 出典 アイテムのデータソース(MARC 21フィールド786または590) シリーズタイトル番号 アイテムが配置されているシリーズのタイトル番号 請求番号(本) 本の請求番号。本が配置されている図書館の棚を示します メモ 必要に応じた、メモのフィールド パート(本) 本のパート番号 章番号/章 本またはその記事を含むジャーナルのこの章の番号 ページ数 記事を含むジャーナルのページ番号の範囲(つまり、57〜69ページ)。ページは必ずしも数値である必要はありません。 開始ページ 記事が掲載されているジャーナルの最初のページ(または章が掲載されている本) 終了ページ 記事が掲載されているジャーナルの最後のページ(または章が掲載されている本) 章著者(本) 本の章の場合、この章の著者 章のタイトル(本) 本の章の場合、この章のタイトル 編集者(本) 本の編集者(通常、章ごとに著者が異なる本に使用されます) 制限されたコース Whether you want the item to be searchable in Primo only within a Courses search scope (once you set up the appropriate Primo search rules). This field appears only if the course_restricted_field parameter is set (see Configuring Other Settings).検出から非公開にする Whether to block the bibliographic record from publishing to Primo. レコードフォーマット 作成するレコードの種類。 このフィールドは、システムが複数のレコード形式をサポートしている場合にのみ表示されます。この機能を有効にするには、Ex Librisサポートにお問い合わせください。 - アイテム情報セクションで、アイテムを配置する図書館の名前を入力して選択するか、矢印アイコンを選択して図書館のリストを開いて選択します。図書館を選択すると、ページが更新され、1つの追加必須フィールドを含む追加のフィールドが[図書館]フィールドの下に表示されます。以下の表に従って、アイテム情報セクションの値を入力します。
アイテム情報フィールド フィールド 説明 個人コピー 冊子がインストラクターによって所有されているかどうかを示します。If selected, the Personal copy of field will replace the Location field to allow you to specify the owner of the physical copy. For more details, see Contributing Instructor Resources to a Reading List.
個人コピーの所有者 個人コピーフィールドが選択されると、アイテムのロケーションに使用する冊子の所有者を指定します。このアイテムを貸し出すには、アイテムを一時的なロケーションに移動する必要があります。それ以外の場合は、検出が抑制されます。 For more details, see Contributing Instructor Resources to a Reading List.
インストラクターのロケーションに保管されているアイテムは、現在ライブラリコレクションの一部ではなく、インストラクターとともに物理的に保管されています。
[配架場所] 冊子が保管されている図書館内の場所。ドロップダウンメニュー機能を使用するか、矢印を選択して、利用可能な図書館とその場所のリストを表示します バーコード アイテムのバーコードを入力します。 If you leave this parameter blank and you chose during your Alma implementation to implement barcode generation, a barcode will be automatically generated for the item when it is saved.複数のバーコードカウンターシーケンスを設定した場合、デフォルトのバーコードカウンターシーケンスが使用されます。See Configuring the Barcode Generation Method and Barcode Validation for more information.For locations with RFID and an active RFID connection as indicated by the connection icon ( ), the barcode can be added for the Barcode parameter by selecting the RFID read icon (or Alt+A).
For additional information, see RFID Support.資料タイプ アイテムの資料タイプ。ドロップダウンメニューまたは矢印を使用して、可能なタイプのリストを開きます。The material type manifests itself only in Primo's Get It/Details tabs.(For information on customizing the material type labels, see Configuring Physical Item Material Type Descriptions.) アイテムポリシー 期間の長さやその他の制限など、アイテムのチェックアウトポリシー。ドロップダウンメニューまたは矢印を使用して、使用可能なポリシーのリストを開きます。 発行メモ A note that appears in Primo's Get It/Details tab. - [保存]を選択します。When the new item is created, it is created in place and a 'Pick from shelf' request is created for it.After the item is scanned in at the relevant acquisition desk, the Acquisition Technical Services work order is created, to be used for complete cataloging at a later time.For an in-depth overview of work orders, see Physical Inventory - Defining and managing work orders in Alma.
-
For locations with RFID and an active RFID connection as indicated by the connection icon ( .), you have the additional option to Write to RFID and Save.[RFIDへの書き込みおよび保存]を選択すると、情報がRFIDに書き込まれます。When the information has successfully been written to the RFID, the information is saved to the Alma database.If you only want to update information in the Alma database, select Save.For additional information, see RFID Support.
Creating and Updating Items in Bulk
以下の方法により、新しいアイテムの作成と既存のアイテムの更新を一括で行うことができます。これらの方法のいずれかを使用して、同じ特性を持つアイテムを作成または更新します。
- 「冊子アイテムを変更」ジョブを実行します。See Change physical items job.
- Via a Repository Import Profile, import items using an Excel or XML file that contains a list of items.See Managing Import Profiles.
- Import items via an API.For that, your institution would need to write an application that creates/updates the items with the API.
-
多数のレコードをインポートする前に、少数のレコードでプロセスをテストすることをお勧めします。
-
プロセス中に書誌レコードが損なわれないようにするために、書誌レコードを見つけてセットとして保存し、[書誌レコードのエクスポート] ジョブを実行することをお勧めします。次に、この書誌レコードを入力ファイルの一部として使用します。Otherwise, if needed, you can restore an earlier version of the bibliographic record via the Metadata Editor.
Working with the List of Items
[アイテムリスト]ページには、冊子タイトルに関連する冊子が一覧表示されます。このページは以下を選択すると表示されます
- Items in the results after a search for a physical item (see Searching Alma)
- View all items in the Physical Item Editor (see Updating Item-Level Information)
[アイテムのリスト]ページには、次の情報に関する列があります。
- バーコード
- 図書館
- 配架場所
- 請求番号
- アイテムの請求番号
- 年
- 巻
- 説明
- 一時的な排架場所
- ステータス
- プロセスタイプ
- アクセス番号
- 受領日
The columns in the list of items can be configured by clicking on the cogwheel icon in its top right corner, so a user can select which of the optional columns they'd like to show/hide for their work.
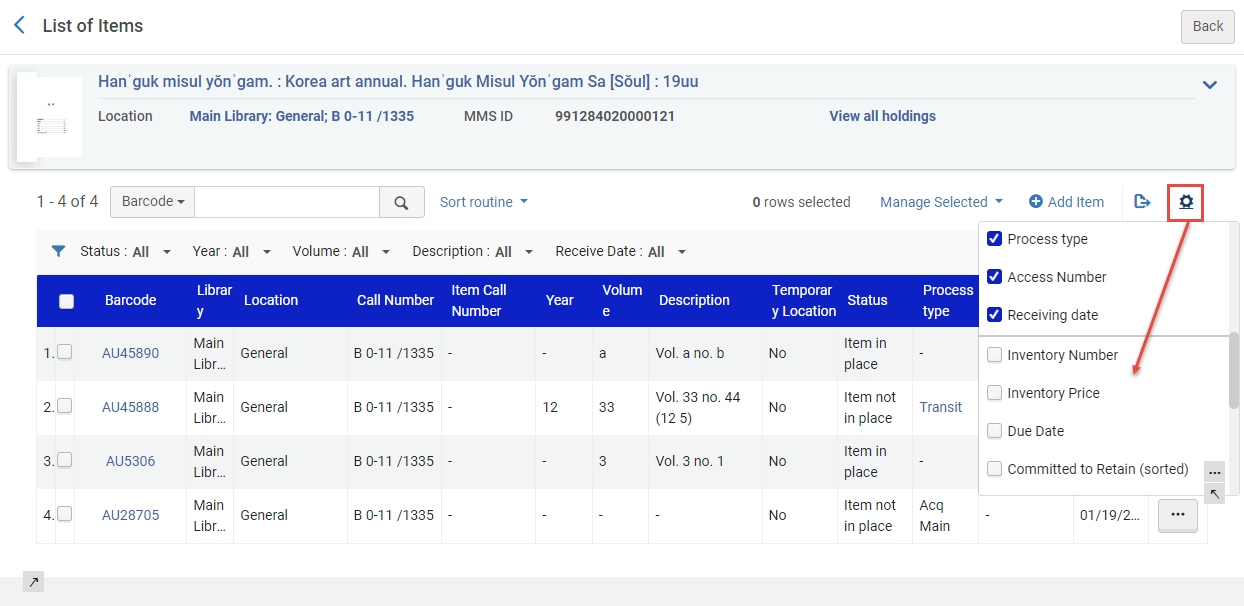
追加できる追加の列は次のとおりです。
-
インベントリ番号
-
目録価格
-
返却期限日
-
所蔵を確約(ソート済み)
-
リクエスト数
-
資料タイプ
-
アイテムポリシー
-
コピーID
-
MMS ID
-
ソース
- ストレージ場所ID
アイテムのリストページには、次のフィルターが含まれています。
- ステータス - フィルタリングオプションには、[すべて]、[配置済みでないアイテム]、[配置済みのアイテム]があります。
- 図書館 - [図書館]のフィルタリングオプションは、設定した図書館によって異なります。
- Location - The filtering options for Location are dependent on the locations that you have configured.
- 年 - ドロップダウンリストに表示されるフィルタリングオプションは、リストされたアイテムの[冊子エディタ]の[年表 I]パラメータで指定された年のコンテンツによって決まります。
- 巻 - ドロップダウンリストに表示されるフィルタオプションは、リストされたアイテムの[冊子エディタ]の[一覧表A]パラメータで指定された巻コンテンツによって決まります。
- Description - The filtering options presented in the drop-down list are determined by the description content specified in the Description parameter in the Physical Item Editor for the items listed.
- 受入日 - フィルタリングオプションは、[すべて]、[受入済み]、および[未受入]です。このフィルタは、[冊子エディタ]に入力された[受入日付]フィールドで提供される日付情報を使用します。[受入済み]オプションを選択すると、リストはフィルタリングされ、受入日が今日またはそれ以前のアイテムが全て表示されます。[未受入]オプションを選択すると、リストがフィルタリングされ、[受入日]フィールドに日付が指定されているか日付が指定されていないレコードのみが表示されます。
For more information, see the Filter a List of Items video (0:47 mins).
アイテムのリストページには、次のページリンクが含まれています。
- Resource description— Open the MARC simple Record View page for the bibliographic record.See Viewing Metadata Read-Only in the Simple Record View Page.
- [配架場所] - 所蔵レコードのシンプルな[MARCレコードビュー]ページを開きます。See Viewing Metadata Read-Only in the Simple Record View Page.
- View all holdings— Open the List of Holdings page.See Working with the List of Holdings for more information.
The barcode link (Barcode column) opens the Physical Item Editor page, which enables you to filter the list of items by status and sort according to the sort routines that were configured (see Configuring Physical Item Sort Routines).
[説明]列が空のアイテムはモノグラフです。[説明]列にテキストがあるアイテムは逐次刊行物です。
次の行アクションを使用できます
- View hidden— View any hidden columns.
- View— View the item in the Physical Item Editor page.
- Edit— Edit the item in the Physical Item Editor page.For more information, see Updating Item-Level Information.
- Duplicate— Duplicate the item using the Physical Item Editor page.既存のアイテムを複製するときに、内部メモと統計メモも新しいアイテムにコピーされることに注意してください。For more information, see Updating Item-Level Information.
- Change Location— Submit a permanent or temporary move item request on the Create Request page.For more information, see Creating a Request.
- Withdraw(if you have the required permissions) — Delete the item, after confirming.[OK]を選択して、アイテムを削除します。For more information on withdrawals, see Withdrawing One or More Items.アイテムに「所蔵を確約」というラベルが付いている場合は、削除できません。ユーザーは次の確認メッセージを受け取ります: 「アイテムは『所蔵を確約』としてマークされており、削除できません」。アイテムを削除するには、ユーザーはアイテムの「所蔵を確約」をいいえに設定し、その後アイテムを削除します。For more information, see Updating Item-Level Information.
- Toggle missing status— Toggle the item status between Item in place and Item not in place.また、ステータスが[配置済みでないアイテム]の場合、[プロセスタイプ]は[行方不明]に切り替わります。This option appears if there is no process type or if the process type is Missing,In Process, or In Transit for roles with relevant privilege and scope.You can search for items by process type 'missing', create sets in Alma, and generate reports in Analytics.The "Missing" process type can also be used to prevent requesting:https://knowledge.exlibrisgroup.com/Alma/Knowledge_Articles/How_to_allow_requests_for_missing_items
- Work order— Create a work order process for the item on the Create Work Order page.For details on work order requests, see Creating a Work Order Request.
- Clear Selection— This option clears the selection and does not withdraw items.
The Manage Selected dropdown allows you to perform the following actions on one or several item records by selecting the checkboxes for these records:
- これらのアクションは、単一の所蔵を持つレコードで使用できます。複数の所蔵を持つレコードの場合、アクションは所蔵リストからのみ使用でき、アイテムリストからは使用できません。
- アイテムレコードのリストが複数のページに表示される場合、ボタンオプションは、現在表示しているページの選択された行でのみ実行されます。これは既知の問題です。
- Run a job(if you have the required permissions) — Select the job to run on the selected items.For details, see Running Manual Jobs on Defined Sets.
If you are configured with a role that is supported for running a job (one of the required permissions), and your role is configured for a certain Library, then when you enter the Items List page for a holding defined for a different Library, you do not see the Run a Job option on the Manage Selected menu.これは既知の問題であり、今後のリリースで修正される予定です。
- Create Itemized Set/Add to Itemized Set(if you have the required permissions).For details, see Creating Itemized Sets/Edit Itemized Sets.
- Bind Items— Select the check box of at least two items to bind the selected items together into one.For details, see Binding (Merging) Items in the List of Items below.このボタンはアイテムの関連書誌レコードに所蔵レコードが1つしかない場合に使用できます。
- Change Holdings— Link to a different holdings record on the List of Holdings page.For more information, see Working with the List of Holdings.
- Open Predicted Items— Opens the list of predicted items.See Prediction Patterns for more information.
- Withdraw Items(if you have the required permissions) — Delete the item, after confirming.[OK]を選択して、アイテムを削除します。For more information on withdrawals, see Withdrawing One or More Items.アイテムに「所蔵を確約」というラベルが付いている場合は、削除できません。ユーザーは次の確認メッセージを受け取ります: 「アイテムは『所蔵を確約』としてマークされており、削除できません」。アイテムを削除するには、ユーザーはアイテムの「所蔵を確約」をいいえに設定し、その後アイテムを削除します。For more information, see Updating Item-Level Information.
- Relink to Another Bib— Move from one bibliographic record to another bibliographic record.For more information, see Relinking Items to Another Bibliographic Record.
The Add Item option allows you to add an item in the Physical Item Editor.基本的なアイテム情報を入力した後、下のタブ(または表示)に追加する追加情報がある場合は、 [保存して編集]オプションを使用してそれらのタブを表示します。
- ENUM/CHRON情報
- メモ
- 履歴
The Add Item from Template option enables users to select a template to use in the Add Physical Item quick cataloging form that automatically populates the item created by that form with the template's data.Once the option is selected, use the magnifying glass drop-down menu or the find (arrow) icon to select from Recently Used,My Templates(Private), or Public templates.The template will encompass all the item's details except for Barcode, Inventory number, Pattern information, Process type, At (request department), Item call number prefix/suffix, and Temporary call number prefix.
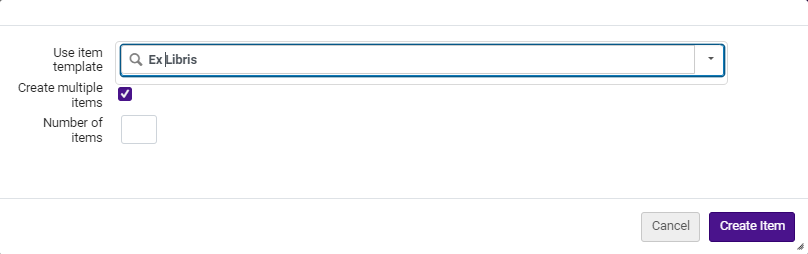
Users can add multipleitemsto a holdings record using Add item from template and specifying the desired quantity.This initiates a process that generates multiple items within the holdings record, pre-filled based on the selected item template.
バーコードシーケンスを使用する場合、システムは各アイテムの作成時に現在のシーケンスを検証し、バーコードの一意性を維持します。したがって、機関内で同じシーケンスを使用して他のアイテムが同時に作成されると、バーコードが連続的に表示されない場合があります。
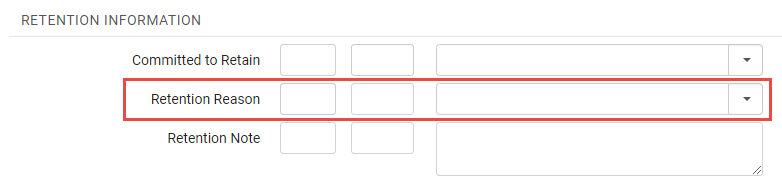
Retention Reason
When an item is Committed to Retain, users have the option to select a retention reason (see image below).The retention reason is an added detail to assist users in understanding why the item is marked for retention. Alma incorporates out-of-the-box values for Retention Reason, but they are customizable.ユーザーは現在の値を変更したり、値を削除したり、新しい値を追加したりできます。
See also:Bibliographic Record Retention for information to prevent the deletion of a bibliographic record.
- In Alma, select Configuration Menu > Resources > Collection Retention > Item Retention Reason.The Retention Reason screen is displayed.
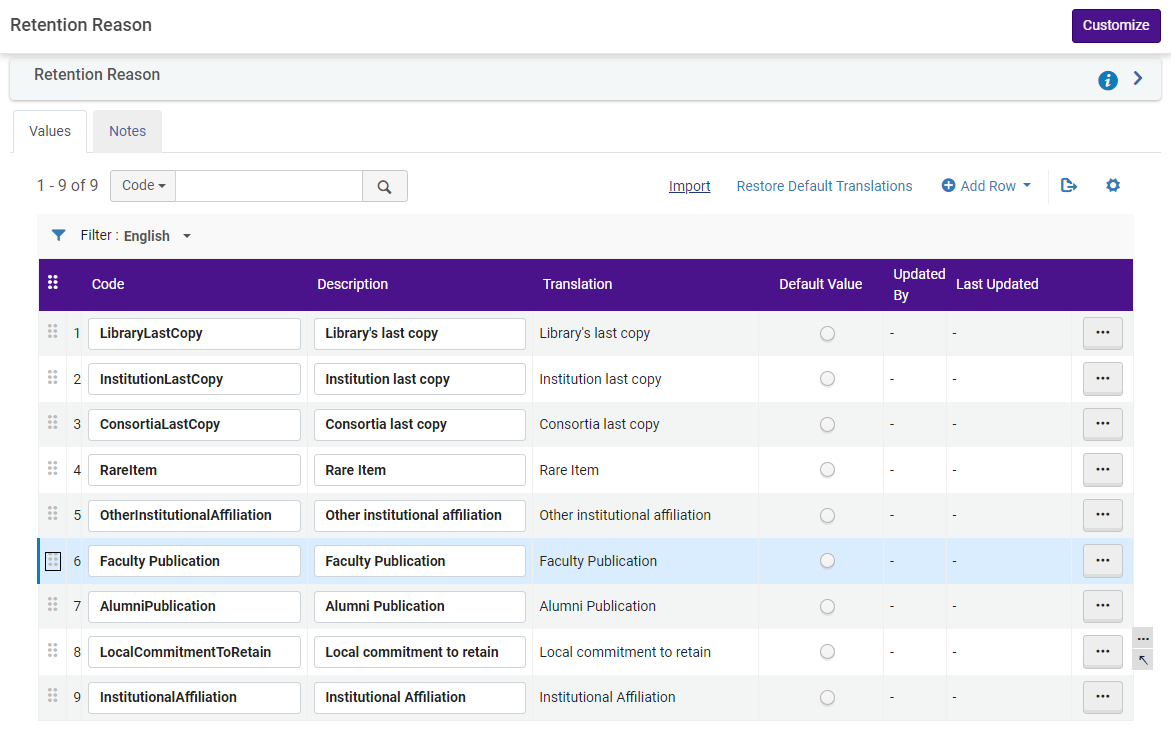 保持の理由
- 現在の値を変更するには、次の手順を実行します:
- In the Code column, select any value and enter a desired value, for example, HistoricalItem.
- In the Description column, repeat the value in the Code column (Historical Item) or enter any custom description (Item of Historical Value).The Translation column is automatically populated when the value is saved.
- If you want the value to be the default Retention Reason value when assigning an item for Committed to Retain, select the radio button (
 ) in the Default Value column for the value.
- カスタマイズを選択します。The screen will revert to the Configuration dashboard.リソース > コレクションの保持 > アイテム所蔵の理由を選択して更新内容を表示します。
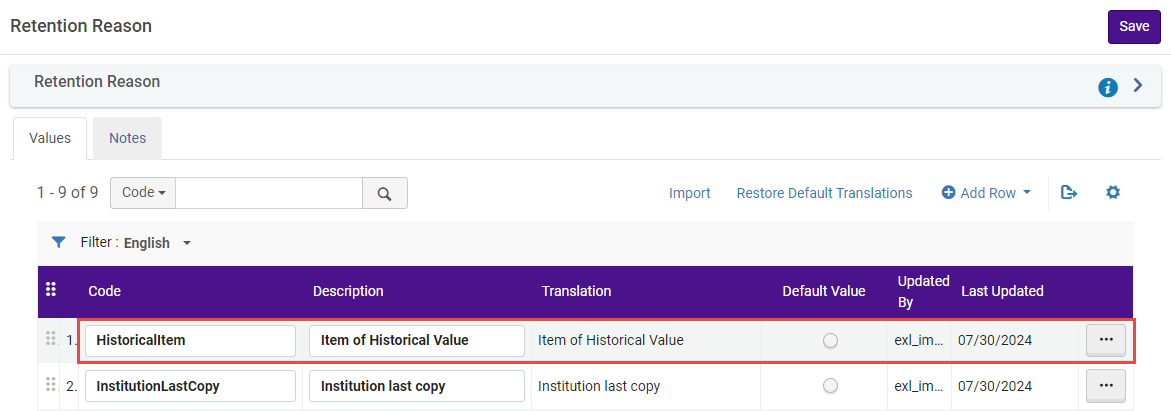 カスタマイズされたアイテム所蔵の理由
- In Alma, select Configuration Menu > Resources > Collection Retention > Item Retention Reason.The Retention Reason screen is displayed.
- In the list of values, select the desired value to delete.「その他のアクション...」ボタンを選択し、消去を選択します。The value is deleted.
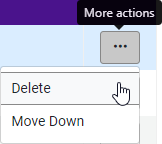 所蔵の理由の値を削除する
- In Alma, select Configuration Menu > Resources > Collection Retention > Item Retention Reason.The Retention Reason screen is displayed.
- 行を追加を選択します。
- ドロップメニューで、コード値と説明を入力し、値をデフォルト値にするかどうかを選択します(はい/いいえ)。
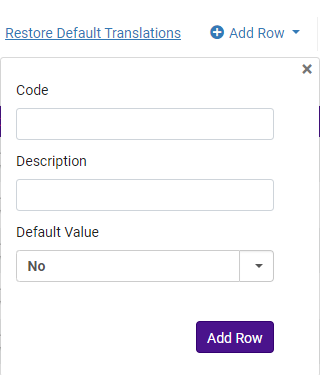 行ドロップメニューオプションの追加
- 行を追加ボタンを選択してください。The value is added to the Retention Reason list.
アイテムの製本(マージ)
You can select two or more items (attached to the same holding) on the List of Items page (see Working with the List of Items) to combine them into a single physical item.アイテムがバインドされると、以前のアイテムが削除され、履歴のない新しいアイテムが生成されます。
Items can be bound if they are in place or in a process of a department, are not in the acquisition process, and have not been bound previously.
Items cannot be bound if they are not in place but not in process (e.g., missing, on loan, lost), or have not been received yet (in process type "Acquisition").
If one of the items is Committed to Retain, when the parameter enable_binding_of_items_committed_to_retain(Configuration Menu > Resources > General > Other Settings) is set to false(default ), binding is not allowed, and you receive the following message, "Some of the selected items are committed to retain.They cannot be bound." When set to true(default false) the items can be bound; however, some data loss from the original items occurs.一方、[保存コミット済み] ステータスが維持され、[保持理由] と [保持ノート] フィールドは結果のアイテムに転送されません。
アイテムが製本されると、次のようになります。
- For in-process items, if the original items are attached to open PO lines, Alma will attempt to remove the PO line.If this is impossible, Alma will remove the item from the PO line to allow the binding process.
- アイテムが含まれていワークオーダープロセスが完了します。
- Alma will attempt to move item-level requests from the items to be bound to the new item. if the new item cannot fulfill the request, the request is canceled.
- アイテムのリストページで、複数のアイテムのチェックボックスをオンにし、[アイテムの製本]を選択します。The Bind Items— Items List page appears.
- 次へを選択します。The Bind Items — Generate Work Order page appears.
- 必要に応じて、関連する分野のワークオーダーのタイプとワークオーダーフィールドを選択し、[メモ]フィールドにメモを追加します。If the original items are in the same work order type & department , Alma will suggest the same work order for the bound item.The Operator can override this suggestion.
- 次のオプションから選択します。
- [作成と編集]を選択して、新しく製本されたアイテムを作成します。This opens the Physical Item Editor page, where you can edit the item's details (see Updating Item-Level Information).
- [作成]を選択して、新しく製本されたアイテムを作成します。アイテムは「アイテムリスト」ページに単一のアイテムとして表示されます。
Regarding Alma Analytics for Bound Items:
- The items which get bound into a new item are available for retrieval in Alma Analytics "Physical Items" subject area.
- The items which get bound into a new item will have status "Deleted" in the "Lifecycle" field from the "Physical Item Details" folder.
- In the example below barcode "AU44538" with description "Vol. 1 Issue 1" and barcode "AU44539" with description "Vol. 1 Issue 2" were bound into a new item barcode "AU44541" with description "Vol. 1 Issue 1-2".
- Therefore barcodes "AU44538" and "AU44539" have Lifecycle "Deleted" and barcode "AU44541" has Lifecycle "Active".

別の書誌レコードへアイテムを再リンクする
アイテムを別の書誌レコードに再リンクするには、次のいずれかの役職が必要です。
- リポジトリ管理者
- 冊子目録オペレーター
- 電子目録オペレータ
- 電子インベントリオペレータ - 限定
Users with these roles can work with holdings metadata only within the scope defined for the role in the User Details page, see Managing User Roles.
個々のアイテムをアイテムレベルで、ある書誌レコードから別の書誌レコードへと移動することができます。複数のアイテムが添付されている所蔵レコードの場合、所蔵レコードに添付されているすべてのアイテムを移動する代わりに、書誌レコード間で単一のアイテムを移動できることを意味します。
- リクエストがタイトルレベルにある場合、リクエストはキャンセルされます。
- リクエストがアイテムレベルである場合、リクエストはアイテムとともに移動します。
- On the List of Items page (see Working with the List of Items), select the item that you want to move and select Relink to another Bib.[別の書誌レコードにアイテムを再リンク]ページが現れます。[アイテムリスト]ページでアイテムの[配架場所の変更]の行アクションを選択して、移動リクエストを送信することもできます。See Creating a Request for more information.
- リソースの説明を参照して入力します。リポジトリ検索ページが表示されます。
- リンクする書誌レコードの検索を完了します。
- 検索結果からアイテムを再リンクするタイトルを選択し、[選択]を選択します。選択したタイトルの所蔵は、別の書誌レコードへのアイテムの再リンクページに表示されます。移動させるアイテムをリンクできる新しい所蔵レコード([新規所蔵を追加])を作成することもできます。
- アイテムを再リンクさせる所蔵レコードを選択し、[選択]を選択します。
- 移動するアイテムが前の所蔵レコードにリンクされている最後のアイテムである場合、システムは、前の所蔵レコードを処理するためのオプションを以下の通り表示します。オプションから選択し、[Go]を選択します。アイテムのリストページに戻ります。
- 所蔵レコードを変更しない
- 所蔵レコードを削除する
- ディスカバリーから所蔵レコードを非表示
- 書誌レコードを削除する(その他の所蔵が存在しない場合)
ポートフォリオを別の書誌レコードに再リンクする管理
Users are able to control who can relink a portfolio to a different bibliographic record.To maintain the ability of existing users with the Electronic Inventory Operator role to relink portfolios to another bibliographic record, Alma has implemented two measures.まず、「別の書誌レコードへの再リンク」機能の可視性を管理するための新たな権限が作成されました。Second, a new role called Electronic Inventory Operator - Limited has been introduced.この新しい役割は、「別の書誌レコードへの再リンク」機能を実行する権限がデフォルトで無効になっている以外は、既存の「電子目録オペレーター」役割と同じです。
If institutions have added the new Electronic Inventory Operator - Limited role and the "Relink" action on the portfolio is still displayed to users, it is possible that another role has been granted this privilege.In such cases, institutions should contact Ex Libris support to have the privilege removed from the relevant role.
Working with Item Templates
アイテムテンプレートを操作するには、新しい物理アイテムを追加するための役割と権限が必要です。
既存の物理アイテムをテンプレートとして保存し、新しい物理アイテムを手動で作成するときにそのテンプレートを使用して、メモ、アイテムポリシー、マテリアルタイプ、一時的な場所などのフィールドに事前に入力することができます。
テンプレートには、以下の項目を除くすべてのアイテムの情報が含まれます:
- バーコード
- 目録番号
- パターン情報
- プロセスタイプと場所(リクエスト部門)
- アイテムの請求番号の接頭辞/接尾辞
- 一時的な請求記号の接頭辞。
- The item's permanent library and location — which are inherited from the item's holdings record.
Using Item Templates to Create Items
When creating an item from a template, the item is pre-populated with the template's data.
Once an operator selects a template to work with, Alma remembers the selection for the user in all manual item creation workflows.作成するアイテムの種類を変更する場合にのみ、テンプレートを再度選択する必要があります。
テンプレートからアイテムを追加する
テンプレートから新しいアイテムを追加する機能は、所蔵アイテムリスト内、およびメタデータ エディターで、所蔵レコードを編集するときに使用できます。
- Selecting Add Item from Template opens the template selection pop-up.
- 新しいアイテムを作成するには、ドロップダウンから使用したいテンプレートを選択します。The new item will be opened as a draft, and the operator is able to make any needed changes before saving.タブ上のコンテンツ インジケーターは、アイテムが保存された後にのみ表示されます (下書きモードでは表示されません)。
Alma will remember the user's template selection in all manual item creation workflows, until the user changes or clears the item template.
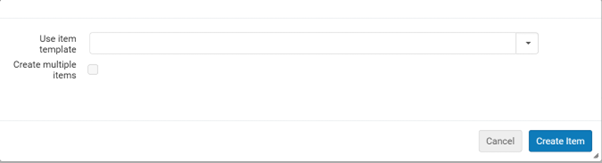
クイックカタログ作成でアイテムテンプレートを使用
物理アイテム追加のクイックカタログ作成フォームでは、テンプレートを使用してアイテムを作成することもサポートしており、そのフォームで作成されたアイテムにテンプレートのデータが事前に入力されます。
テンプレートを選択すると、選択したテンプレートによって制御されるため、他のアイテムフィールドはグレー表示されます。
Alma remembers the user's template selection in all manual item creation workflows, until the user changes or clears the item template field.
アイテムテンプレートを使用して複数のアイテムを作成
テンプレートを使用してアイテムを作成する場合、所蔵レコードに複数のアイテムを追加することができます。
- 1 回の操作で最大 99 個のアイテムを追加することができます。
- バーコード シーケンスを使用する場合、システムは、(バーコードの一意性を確保するために)各アイテムを作成する際に現在のシーケンスをチェックします。したがって、プロセスの実行中に同じシーケンスを使用して機関内で他のアイテムが作成された場合、バーコードは連続していない可能性があります。
複数のアイテムを追加する場合は、追加したいアイテムの数を指定します。
これにより、選択したアイテム テンプレートから事前に入力された、所蔵レコードの下に複数のアイテムを生成するプロセスがトリガーされます。The items are created when the job finishes running.
It is also possible to create multiple items in Alma without using templates, with import profiles or the "Item Creator by Excel" CloudApp.
Creating and Updating Item Templates
- アイテムテンプレートを作成するには、アイテムエディタを開き、テンプレートに入力したいフィールドのみがアイテムに記入されていることを確認し、テンプレートとして保存を選択します。
- Creating a template can be done from an existing item, or from an item draft.To create a new template based on an existing template, use Add Item from Template to create a pre-populated item draft, make the changes you would like and Save as a template using a different name.
テンプレートフィールドとして保存:
テンプレート名 テンプレートに一意で明瞭な名前を選択します。If you use the name of a template that already exists, that template is updated with the contents of your current item. 既存のテンプレート 更新する既存のテンプレートを選択します。See Edit an Existing Template. 公開テンプレート Select "No" to create a private template only you can see and use.Select "Yes" to have the template available to all physical inventory operators in the library.Any user who can create items is able to use and update a public template. - Select Save to save your template.
既存のテンプレートを編集
- In a holdings record, select Add Item from Template and select the template you wish to edit.
- In the item editor, make the changes you want, and make sure only the fields you want populated in the template are filled in (except for permanent library and location, which are inherited from the holdings record and aren't part of the template workflow).
- テンプレートとして保存を選択します。
- In the Existing template drop-down, select the template you want to update, and select Save.
既存のテンプレートに変更を加えると、アイテムエディターの現在のデータでテンプレートが更新されます。If you wish to override a template with data from an existing item, it can be done by opening it in the item editor, selecting Save as Template and selecting the template you want to override.
テンプレートを削除
- アイテムエディタを開いて、テンプレートとして保存を選択します。
- In "Existing template" select the template you want to delete, and select Delete.

Updating Item-Level Information
[冊子エディタ]を使用すると、冊子レベルの情報を更新できます。
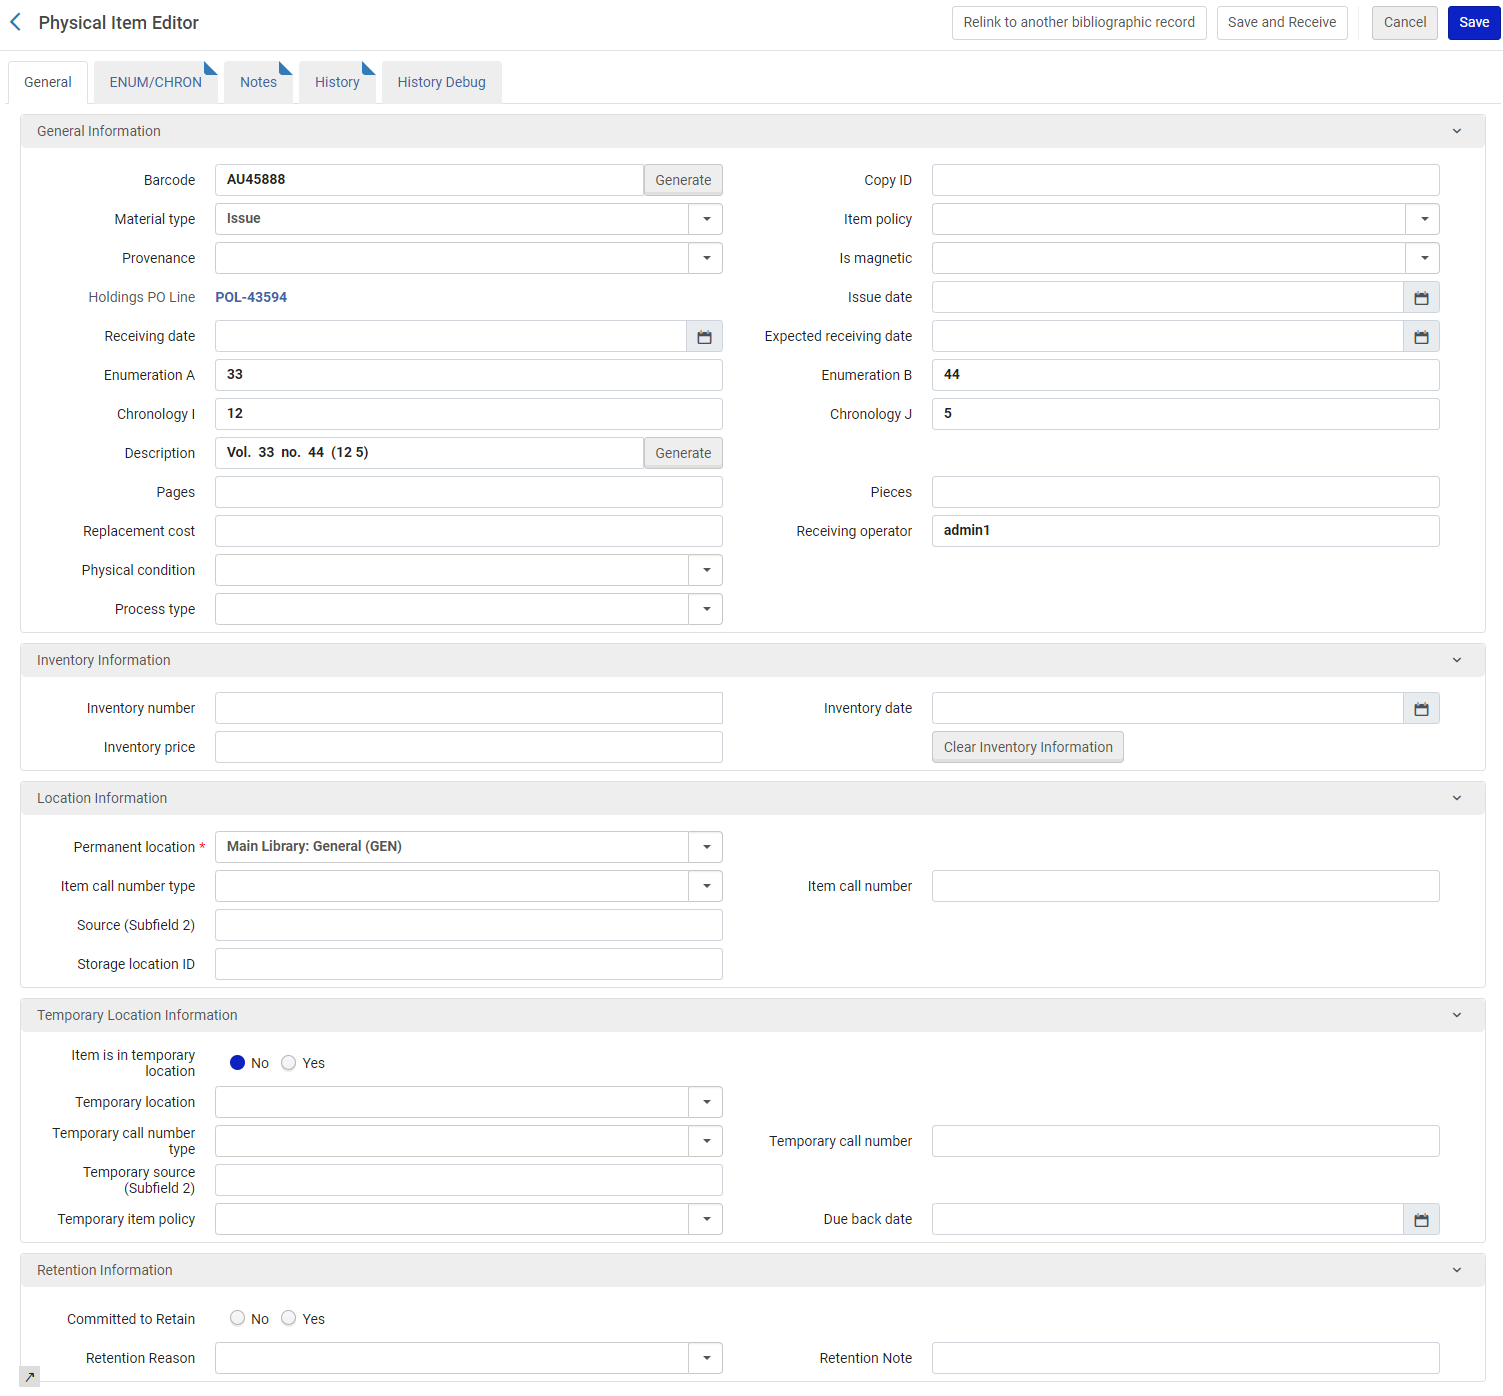
MDエディタでレコードを操作しながら、新しいアイテムを作成できます。See Navigating the MD Editor and Add Item for more information.
- 更新する冊子を検索します。For more information, see Searching in Alma.この手順で以下に説明する結果を得るには、タイトルではなく冊子を検索する必要があります。
- 更新するアイテムを編集します。[冊子エディタ]ページが表示されます。次のセクション/タブで整理された[冊子エディタ]ページのパラメータの説明については、以下の表を参照してください。
- Page header/summary information
- General tab
- ENUM/CHRON tab
- Notes tab
- History tab
Physical Item Editor Page - Page Header フィールド 説明 リソース説明 これにより、タイトル、著者などが識別されます。このリンクを選択して、書誌のシンプルな[MARCレコードビュー]ページを開きます。See Viewing Metadata Read-Only in the Simple Record View Page. 所蔵 これにより、所蔵レコードの場所情報が識別されます。このリンクを選択して、所蔵のシンプルな[MARCレコードビュー]ページを開きます。See Viewing Metadata Read-Only in the Simple Record View Page. 保存して、受け入れる Enables users to work on an item (in the Item Editor), save and receive the item in a single action.Upon selecting Send and Receive, a dialogue window is displayed enabling users to fill in the receiving date and select whether to keep in department. [保存して受け取る] ボタンは、次の条件下で有効になります。
- 注文 (PO) 明細の所有ライブラリに対する受信オペレーター/受信マネージャーの役割を持つユーザー、または注文明細の所有ライブラリを「受入」として指定されたライブラリに対して受信オペレーター/受信マネージャーの役割を持つユーザー。
「受信日」フィールドが未入力で、「注文明細」フィールドが入力されている場合。
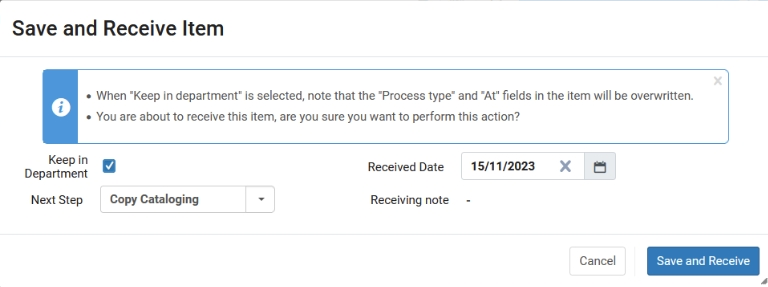 アイテムの送受信ポップアップウィンドウ
The Keep in Department,Next Step and Received Date fields are populated with the same values as in the "Receive New Material".If these fields are modified in the pop-up, their values will be saved as the user preferences.
Selecting Save and Receive, the item is saved with the Received Date, Receiving operator, and Process type and "At" when "Keep in Department" is selected.The PO line will be progressed in the workflow (the same as if the receive was done from the "Receive New Material" page or from the PO line itself.
「現在」にリストされている部門は、アイテムを保存および受け取る機能に直接影響します。ユーザーが正しい部門に所属していない場合は、エラーが発生します。また、ダイアログウィンドウ内の「次のステップ」フィールドに表示される値は、「現在」の部門に対応します。
バーコード これによりアイテムのバーコード番号が識別されます。 プロセスタイプ これは、自動プロセスタイプ(紛失、ローン、トランジットなど)または作業指示タイプのいずれかになります。 所蔵ID これにより、所蔵レコードID番号が表示されます。 アイテムID これによりアイテムID番号が表示されます。 ステータス
これによりアイテムのステータス(配置済みのアイテムなど)が指定されます。
See Changing an Item's Status for more information.
すべての所蔵を表示する Select this link to open the List of Holdings page associated with the item that you're editing. すべてのアイテムを表示する Select this link to open the List of Items page that lists all the items associated with the same holdings record. シェルフリストを参照する 選択するとシェルフリストを参照するページが開き、請求番号を検索できます。請求番号をコピーしておくと後で[戻る]を選択して[冊子エディタ]ページに戻った際に、貼り付けることができます。このオプションを使用すると、アイテムレコード情報と請求番号タイプ(存在する場合は、[冊子配架場所の編集]ページ内の、[冊子配架場所の請求番号タイプ]の設定により決定されます)から図書館と場所のパラメータが自動的に表示されます。See Browsing the Shelf Listing for more information.
You can configure a description template to use when generating an item description based on the ENUM/CHRON Information tab.You do that from the Description Template Setup Rules page (Configuration Menu > Resources > General > Description Templates).See Configuring Item Description Templates.Physical Item Editor Page - General Tab パラメータ 説明 バーコード This parameter identifies the item's barcode. バーコードパラメータが空の場合、次のいずれかの方法を使用してバーコードを追加します。- バーコードを手動で入力します。
- [生成]を選択します。If your Barcode Generation Configuration is configured with multiple barcode counter sequences (see Configuring the Barcode Generation Method and Barcode Validation for more information), a pop-up appears from which you can choose the barcode generation sequence for this item.[バーコード生成設定]に図書館レベルのバーコードカウンターシーケンスが含まれている場合、システムは編集中の冊子に表示される所蔵場所を確認し、機関レベルのバーコードカウンターシーケンスに加えて、その図書館の機関レベルの設定済みのバーコードカウンターシーケンスを提示します。編集中の冊子に表示されている所蔵場所をシステムがチェックし、その場所に図書館レベルのバーコードカウンターシーケンス設定がないと判断した場合、機関レベルのバーコードカウンターシーケンスのみがポップアップダイアログボックスに表示されます。
- [保存]を選択します。If the barcode parameter is empty when you select Save and you have configured your system for automatic barcode generation, the system automatically creates a barcode for the item using the default barcode counter sequence (see Configuring the Barcode Generation Method and Barcode Validation for more information).上記のように、所蔵図書館に一致する図書館レベルのバーコードカウンターシーケンス設定がある場合、デフォルトの図書館レベルのバーコードカウンターシーケンス設定が使用されます(同じ図書館に複数の図書館レベルのバーコードカウンターシーケンス設定がある場合に)。所蔵図書館と一致する図書館レベルのバーコードカウンターシーケンス設定がない場合、デフォルトの機関レベルのバーコードカウンターシーケンス設定が使用されます。
- For locations with RFID and an active RFID connection as indicated by the connection icon ( .バーコードは、RFID読み取りアイコン(またはAlt+A)を選択することにより、[バーコード]ボックスで追加/更新できます。For additional information, see RFID Support.
コピーID The item's copy ID, used to identify individual copies of the same title when multiple copies exist at the same location. 資料タイプ The item's physical form, such as a book or CD-ROM.定義済みのドロップダウンリストから選択します。Note that the material type manifests itself only in Primo Get It/Details tabs.(For information on customizing the material type labels, see Configuring Physical Item Material Type Descriptions.) アイテムポリシー The item's override policy for loan rules.このアイテムのリクエストが満たされる条件を定義します。Select from items in the drop-down list (see Configuring Item Policies). ソース The provenance code indicating the item's origin, as selected from options in the drop-down menu.To configure these options, see Configuring Provenance Codes.
If joint use of inventory was configured for the institution, where one institution can order for another institution in a Consortia, this field indicates the purchasing institution (if this was set up).For details, see Joint User of Inventory in Consortia.
磁気媒体です オプションは[はい]または[いいえ]です。 アイテム内にセルフチェックマシンによって破損する可能性のあるデジタルプロパティが含まれているかどうかを指定します。[はい]が選択されている場合、セルフチェックマシンはアイテムの消磁を試行しません。通常、CD-ROMやデジタルカセットなどのアイテムの場合、値は[はい]になります。 発注明細(POL)
このパラメータは、基本的な必須情報を入力し、[保存して編集]を選択した後にのみ表示されることに注意してください。
クイックピックリストアイコンを使用して[注文明細の選択]ページを開き、アイテムの注文明細を見つけます。
注文明細を選択した後、または注文明細が注文明細パラメータにすでに選択されており適切な役職権限がある場合、[詳細の表示]リンクを選択することで、選択した注文明細に関する詳細情報を表示します。
 冊子エディタで選択された注文明細独立型冊子の注文明細のみがリストに表示されます。
発行日 予測パターンから生成された発行日。 受入日 資料が初めて実際に受入/有効化された日付。[受入日]ボックスを選択し、カレンダーダイアログボックスから受入日を選択します。 受入予定日 アイテムが受入できる日と予想された日付。 一覧表A
リストのメインレベル、通常は巻数です。
これは逐次刊行物および複数のパートからなるモノグラフにのみ使用する必要があることに注意してください。
一覧表B
一覧表の第2レベル、四半期などです。
これは逐次刊行物および複数のパートからなるモノグラフにのみ使用する必要があることに注意してください。
年表I 年表のメインレベル、通常は年。 年表J 年表の第2レベル、通常は月。 説明(生成) System or user-generated description based on entries in the Enumeration and Chronology fields above and in the ENUM/CHRON tab.Select Generate to have Alma enter the description.To configure a description template, see Configuring Description Templates. このフィールドは、物理的アイテムが図書とみなされるか、または逐次刊行物とみなされるかを決定するために使用される場合があります。フィールドが定義されている(文字が含まれている)場合、アイテムは逐次刊行物(または巻数が表示される複数巻数図書)とみなされます。フィールドが空の場合、アイテムは図書とみなされます。Only the first 256 characters of the description appear in the Primo Get It tab (in a drop-down list).[Get It]タブで適切に表示されるように、説明はこの文字数より短くすることをお勧めします。ページ数 The item's number of pages. ピース The item's number of pieces. 交換費用 アイテムが紛失した場合にユーザーに課される料金。You can configure whether the PO line price is copied to the Replacement cost field in the item for physical one time orders.You can also define whether to add or reduce the amount to the PO line price being copied to the item's Replacement cost field.For more information see Configuring Other Settings. 受入オペレーター アイテムを受け入れたオペレーター プロセスタイプ 現在のワークオーダーの処理方法。このフィールドで値を選択すると、[場所]フィールドにワークオーダーが実行される場所が表示されます。 アイテムを保存すると、リポジトリ検索ページに次の情報が表示されます。- プロセスタイプ:ワークオーダーの現在の処理方法
- ステータス:値は[配置済みでないアイテム]です
This information also appears on the Resource Request Monitoring page (see Managing Requests and Work Orders).アイテムから既存のワークオーダーを削除するには、アイテムの[編集]リンクから[冊子エディタ]ページにアクセスするときにこのフィールドをクリアにします。アイテムのステータスは、[リポジトリ検索]ページに[配置済みのアイテム]として表示されます。Note that this workflow skips the next step calculation used when marking a work order as "Done", and therefore requests are not activated unless the item is scanned in.For more information about assigning a work order process to an item, see the Assign a Process to an Item video (2:54 mins).物理的条件 次のオプションのいずれかを選択して、アイテムの物的状態を識別します。 - 堅くてもろいアイテム
- 破損したアイテム
- 劣化したアイテム
- 壊れやすいアイテム
冊子の状態が識別され、アイテムレコードとともに保存された後、この情報は冊子目録を公開するときに公開用に選択することができ、詳細検索の基準として使用できます。冊子の変更ジョブを実行する場合、他のフィールドを変更するためのパラメータとして冊子条件を使用できます。場所 [プロセスタイプ]フィールドに表示されるワークオーダーのワークオーダー部署。 アイテムを保存すると、リポジトリ検索ページにこのフィールドの値(つまりアイテムの配架場所)が、[場所:]のフィールド値として表示されます。目録情報 目録番号 この冊子の目録番号を入力/割り当てます(最大20文字)。 手動で番号を入力できます。If inventory numbers are configured for your library (see Configuring Physical Item Sequences), select Allocate to enter the next number.図書館に複数のナンバリングシーケンスが定義されている場合は、[シーケンスリスト]ダイアログボックスから目的のシーケンスを選択し、[選択]を選択します。必要に応じて、複数の冊子に同じ番号を使用できます。目録価格 アイテムの価格。[割り当て]を選択して目録番号を設定すると、価格は注文明細から取得されます(注文明細の通貨を使用)。これは変更して、アイテムの実際の値を図書館に反映させることができます(たとえば、交換にかかる費用)。
Inventory price is not what patrons are billed when the item is lost.For that purpose, see the "Replacement cost" field.
1より小さい値の場合、先頭に0を入力します。For example,0.44, not .44.値は所属機関のデフォルト通貨であると想定されています。For more information, see Configuring Currency Subsets.Users can validate the item inventory price by configuring the regular expression (regex) that determines which characters may be used when manually entering an inventory price in the item editor.When an item with an invalid value in the inventory price is edited and saved, the operator will be alerted that the inventory price doesn't match the institution's configuration, so they can check and correct the data if needed.The validation of the item inventory price is controlled by the customer parameter (CP):item_editor_inventory_price_regex that is accessed from the Resources mapping table (Configuration > Resources > General > Other Settings).For more information on the CP, see Configuring Other Settings (Resource Management).在庫日
在庫日を入力または選択します。
[割り当て]を選択して目録番号を設定すると、このフィールドには今日の日付が入力されます。必要に応じて、別の日付を選択します。
目録情報の消去ボタン このセクションのすべての目録パラメータをクリアするには、このオプションを使用します。 受入番号
Enter/allocate a receiving number for this physical item.Note that this parameter only appears when a Receiving Number sequence is configured (see Configuring Physical Item Sequences).
You can enter a number manually or select Allocate if receiving sequence numbers are configured for your library.When you select Allocate, the next number in the sequence is added to this parameter.図書館に複数のナンバリングシーケンスが定義されている場合は、[シーケンスリスト]ダイアログボックスから目的のシーケンスを選択し、[選択]を選択します。必要に応じて、複数の冊子に同じ番号を使用できます。
除外番号
Enter/allocate a weeding number for this physical item.Note that this parameter only appears when a Weeding Number sequence is configured (see Configuring Physical Item Sequences).
You can enter a number manually or select Allocate if weeding sequence numbers are configured for your library (see Configuring Physical Item Sequences).When you select Allocate, the next number in the sequence is added to this parameter.図書館に複数のナンバリングシーケンスが定義されている場合は、[シーケンスリスト]ダイアログボックスから目的のシーケンスを選択し、[選択]を選択します。必要に応じて、複数の冊子に同じ番号を使用できます。
除外日付
Enter or select a weeding date for this physical item.Note that this parameter only appears when a Weeding Number sequence is configured (see Configuring Physical Item Sequences).
If you select Allocate to set a weeding number, this field is populated with today's date.必要に応じて、別の日付を選択します。
Location Information: 常設的な排架場所 常設的な図書館と図書館の場所を選択します。For more information, see Moving Items Between Holdings and Deleting Holdings Records.
When a holdings record holds only a single item, and you move this item to a different location, the item remains associated to the same holdings record, and only the holdings' details are modified.An indication that recent changes to the holdings record took place appears in the History tab of the Physical Item Editor that states "There have been Holdings changes in the past 6 months".This indication appears when any type of change in the holdings took place, not only when the location has changed.Select the Holdings changes button to view the history of item changes.Note that this behavior only takes place for a holdings record with a single item.When the holdings record has several items and you want to move some of these items, then a new holdings record is created, and all the selected items are moved to that holdings record.After moving items, if the original holding record remains without items, it will be deleted.
請求番号タイプ ドロップダウンリストから、請求番号の代替識別番号タイプを選択します。オプションの例として次が挙げられます。 - 議会図書館分類
- デューイ十進分類法
- NLM分類
- Source specified in subfield $2 (see Source (Subfield 2) for more information)
アイテム請求番号 所蔵レコードに存在する可能性のある請求番号と異なる場合がある特定のアイテムの請求番号。 ソース(サブフィールド2) 所蔵レコードの$2に相当する請求番号ソースを入力します。これは請求番号タイプがサブフィールド2で指定されたソースである場合に関連します。See Browsing the Shelf Listing for more information. ストレージ場所IDアイテムが保存されている場所のID番号。プレフィックスを選択 以下に説明するように、プレフィックスを入力し、[生成]や[計算]と組み合わせて使用します。 生成 - To enable call-number generation on-the-fly set the following customer parameters need to be set to True(Configuration Menu > Resources > General Configuration Other Settings):accession_number_applicative_seq and item_call_numbers_generate_enable.
- デフォルトでは、サフィックスの連結は無効になっています。Contact Ex Libris staff to activate it in coordination with your institution.
次のいずれかの方法を使用して、アイテムの請求番号を生成します。
次の場合に使用します。 次を行います: The prefix already exists in Alma and you know it.Enter the exact prefix for the sequence (as configured in the Accessions Numbers configuration table, see Configuring Accession Numbers) in the "Choose Prefix" field, and select Generate.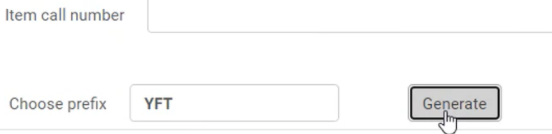 When 'YFT' prefix is an existing prefix in AlmaThe prefix already exists in Alma, and you would like to select it from a list.Select Generate without specifying any prefix in the "Choose Prefix" field.図書館と場所に一致するプレフィックスのリストが表示されます。必要なプレフィックスを選択します。システムはそれを「プレフィックスを選択」フィールドに表示します。Then select Generate to generate the numberThe system presents the following message: "An accession number sequence with the prefix <prefix> was selected and will be used to generate the call number upon save.The expected value is <expected value>."
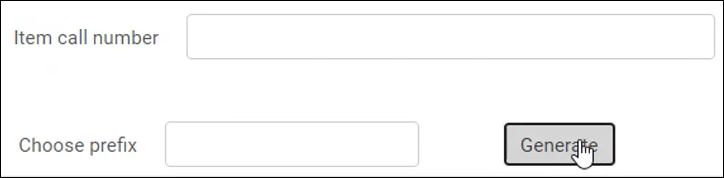 The prefix does not exist in Alma and you want to set it.
Enter the desired prefix in the "Choose Prefix" field, and select Generate.The system presents the following message: "An accession number sequence with the prefix <prefix> was selected and will be used to generate the call number upon save.The expected value is <expected value>."
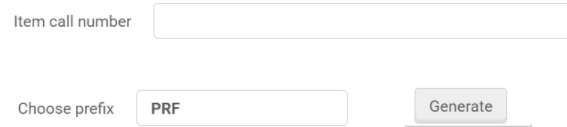 When 'PRF' prefix does not yet exist in AlmaIn addition, Alma saves this prefix for future use in the Accessions Numbers configuration table, see Configuring Accession Numbers.The number that is generated will be determined by the matching sequence found in the Accession Numbers configuration (see Configuring Accession Numbers for more information).[保存]を選択すると、番号が生成されます。The Other Settings parameter item_call_numbers_generate_enable must be set to true for Generate to appear (see Configuring Other Settings (Resource Management) for more information).For more information on generating an item call number, watch the Generate Alternative and Temporary Item-Level Call Numbers video (2:51 mins).
計算 Use Calculate to create an alternative item-level call number based on existing call numbers in the Alma repository. Enter a full prefix for the Choose prefix parameter to help the system locate a matching prefix in the Alma repository in order to create a call number.[保存]を選択すると、作成される請求番号が生成されます。システムは、[冊子エディタ]ページの[計算]と[生成]の両方、またはこれらの機能のいずれか1つのみを使用するように設定できます。[計算]機能は、Ex Librisで設定する必要があります。技術的な問題により、[計算]で同じプレフィックスの代替請求番号と一時請求番号の両方を同時に使用すると、同じシーケンスが両方で計算されて保存されます。所属機関で有効にすると、図書館レベルでの[計算]の使用を制限できるため、機関レベルのシーケンス設定のみを使用できます。See Library for configuration information regarding the Disable Item Call Number Calculation option.Temporary Location Information: アイテムは一時的な配架場所にあります(はい/いいえ) アイテムが一時的な配架場所にあるかどうか。 これを[いいえ]に設定しても、アイテムの一時的な図書館と場所の値はクリアされません(次の2つのフィールドを参照)。アイテムが実際にその場所にあることを示す前に、アイテムの一時的な図書館と配架場所をマークしたい場合があります。For lending requests, before shipping, if the item was already in a temporary location, then, when returned, the item will revert back to the previous temporary location.これは一時的な場所にのみ適用され、一時的な請求番号タイプ、返却期限日などのその他の一時的な条件には適用されないことに注意してください。You can remove items' temporary location indications in bulk using the Change physical items job.See Performing Global Changes on Physical Item Records for more information.For more information about modifying this setting using the Change Physical Items job, see the Remove Temporary Item Location Indicator video (5:27 mins).一時的な排架場所 一時的な図書館と図書館の配架場所を選択します。[プレフィックスの選択]、[生成]、および[計算]機能を一時的な場所に表示するには、一時的な図書館を指定する必要があります。一時的な請求番号タイプ 一時的な場所でアイテムに使用される請求番号タイプ。 一時的な請求番号 The item's call number when using the temporary call number type at the temporary location.
The Permanent Call Number will be displayed for the temporary location in Alma and Primo, if there is no temporary call number assigned.
ソース(サブフィールド2) 所蔵レコードの$2に相当する請求番号ソースを入力します。これは請求番号タイプがサブフィールド2で指定されたソースである場合に関連します。See Browsing the Shelf Listing for more information. 一時的なアイテムポリシー The item's temporary override policy.ポリシーが設定され、ドロップダウンリストに表示されます。 プレフィックスを選択 プレフィックスを入力し、[生成]または[計算]と組み合わせて使用します。 生成 Generate a temporary call number using the methods describe above for Generate.See Temporary Library for more information. 計算 Use Calculate to create a temporary item-level call number based on existing call numbers in the Alma repository.See Calculate and Temporary Library above for more information. 技術的な問題により、[計算]で同じプレフィックスの代替請求番号と一時請求番号の両方を同時に使用すると、同じシーケンスが両方で計算されて保存されます。返却期限日 一時的な配架場所からのアイテムの返却期限日。 Retention Information: 保持を確約 Select Yes/No to mark items as committed to retain and prevent withdrawing them.This is useful when several libraries pool their resources together and some of the library's items need to be retained even when internal usage is low.This is reflected in Alma Analytics in order to help libraries to manage their collaborative collections.
Upon selecting "Yes", the Committed to Retain icon (
 ) is displayed for the physical item in the Item Editor.
この機能は、インポート、エクスポート、および API ワークフローでもサポートされています。
所蔵の理由 図書館がアイテムの所蔵を確約した理由。ドロップダウンメニューを使用すると、ユーザーは所蔵理由の値を選択してすべてのメンバーと共有できます。 - 所蔵理由は、詳細検索でのみ検索できます。簡易検索は、説明ではなくコードでのみ検索します。
- 値を追加したり、すぐに使用できる値を削除したりすることができます。
- In the context of "Consortia", the central office can define and share "Retention Reason" values with all members with the Manage Table in Network option.
Possible codes are listed in the 'Retention Reason'code table.The valid values for this parameter are controlled by the code-table: RetentionReason.現在定義されている値は次のとおりです:
- Alumni Publication (同窓会誌)
- コンソーシアム最終コピー
- 教員向け出版物
- 機関誌の最後のコピー
- 機関誌
- 図書館の最後のコピー
- 所蔵にあたっての地域のコミットメント
- その他の機関の所蔵
- 珍しいアイテム
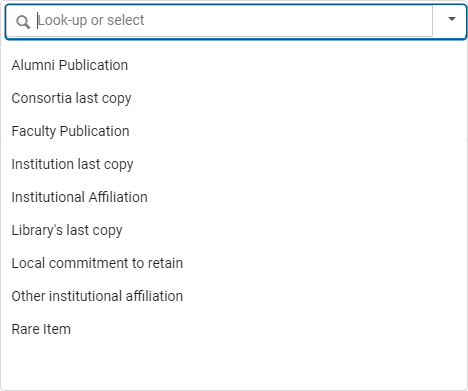 所蔵の理由 - すぐに使用できる値
所蔵メモ アイテムを所蔵するという図書館のコミットメントに関するフリーテキストのメモ。 冊子エディタページ - ENUM/CHRONタブ メモタイプ 説明 刊行年 年の情報。
This field is not editable and is kept in view mode only to support customers that previously used it.
一覧表AからH 複数レベルの一覧表。 年表IからM 年表の複数のレベル。 ブレークインジケーター 現在開発中です。 一覧表または年表の中断の理由を示すコード。パターン情報 パターンタイプ アイテムの所蔵レコードからの、一意の85Xフィールドのリスト。たとえば、所蔵レコードに853および854フィールドが含まれる場合、リストには3 853および4 854が含まれます。 リンキング番号 現在選択されている85Xフィールドからの$8のサブフィールドのリスト。たとえば、[パターンタイプ]が3 853で、所蔵レコードに値1と2がサブフィールド$8の2つの853フィールドが含まれている場合、リストには1と2が含まれます。 ユニットタイプ ユニットのタイプこれは、関連する[パターンタイプ]と[リンキング番号]の最初のサブフィールド$oによってその場で入力される読み取り専用フィールドです。 Physical Item Editor Page - Notes Tab メモタイプ 説明 最大長 公開メモ Note content displayed in the Primo Get It tab under the Holdings column.See Displaying Public Notes. 4000文字 フルフィルメント注記 コンテンツは貸出・返却プロセス中に表示されることに注意してください。たとえば、コンテンツには「ディスクの確認」という文が含まれており、アイテムのチェックイン時に貸出・返却受付を促します。 4000文字 内部向けメモ 内部メモはスタッフのみが閲覧でき、ユーザーは閲覧できません。ただし、ネットワークを共有している他の機関ゾーンのスタッフには公開されます。
内部注記 1 Note content for internal use by Alma staff. 4000文字 内部注記 2 Note content for internal use by Alma staff. 4000文字 内部注記 3 Note content for internal use by Alma staff. Specifically, this note may contain content regarding a shipped resource sharing lending item, as sent to Alma by the NCIP source system in the NCIP message's shipping note.配信メモは次の形式で表示されます。||Shipping Note||<text of shipping note>||Shipping Note||出荷メモは、OCLCナビゲータなどのNCIP実装者によって使用され、リソース自体、依頼者やピックアップおよびリクエストされた場所など、発送されたリソース共有貸出アイテムに関する追加情報を図書館システムに更新します。4000文字 Statistics Notes: 統計メモの内容は、設定されカスタマイズされたドロップダウンリストから選択されます。See Configuring Statistics Notes for information about configuring fixed drop-down lists of options for statistics notes.統計メモ1 選択して保存したコンテンツは、アナリティックスの[新規 > アナリシス > 冊子]に表示されます。 4000文字 統計メモ2 選択して保存したコンテンツは、アナリティックスの[新規 > アナリシス > 冊子]に表示されます。 4000文字 統計メモ3 選択して保存したコンテンツは、アナリティックスの[新規 > アナリシス > 冊子]に表示されます。 4000文字 Physical Item Editor Page - History Tab パラメータ 説明 リポートタイプ: アイテムの変更 [冊子エディタ]ページの一般タブで表示/編集可能なアイテムに加えられた変更。このリポートは、変更を行ったオペレータの名前、変更が行われた日付、変更されたフィールド、および変更前と変更後の値を識別します。 所蔵の変更 図書館(852 $$b)、ロケーション(852 $$c)、請求番号タイプ(852第1インジケータ)、請求番号(852 h、i、 j、k、l、m)、および受入番号の変更。このリポートは、変更を行ったオペレーター名、変更が行われた日付、変更されたフィールド、および前後の値を識別します。Changes to the last item under the holding do not appear in this tab; they appear only under the Holdings tab (in the Item Editor).その理由は、この場合、新しい所蔵を作成するのではなく、既存の所蔵が変更されるためです。
フルフィルメント活動 貸出/返却活動。このリポートは、変更が行われた日付、完了したアクションタイプ(貸出/返却)、変更を行ったオペレータ/デスク名、借り手名、および借り手IDを識別します。所属機関内の貸出/使用情報がページに表示されます。 貸出名とIDは、貸出・返却受付オペレータ、貸出・返却受付マネージャー、貸出・返却受付オペレータ - 限定、リクエストオペレータ、フルフィルメントサービスオペレータ、フルフィルメントサービスマネージャー、リソース共有パートナーマネージャー、フルフィルメント管理者、ユーザー管理者、統括システム管理者の役職に対してのみ表示されます。上記の役職のいずれかでこの権限を無効にするか、他の役職の権限を有効にするには、Ex Librisサポートにお問い合わせください。[オペレータ]列は、マネージャーと管理者のみに表示されます。See Configuring Users' Ability to View Operator Details. - Select one or more of the following tabs to view or make changes to the physical item's information:
- General Information (see the Physical Item Editor Page - General Tab table above)
- ENUM/CHRON Information (see the Physical Item Editor Page - ENUM/CHRON Tab table above)
- Notes (see the Physical Item Editor Page - Notes Tab table above)
- History (see the Physical Item Editor Page - History Tab table above)
- 変更が完了したら、[保存]を選択します。
- For items that are missing or not in place, you have the additional option to Save and Toggle Missing Status, enabling you to also toggle the item's missing status from "in place" to "missing" or from "missing" to "in place".When you select Save and Toggle Missing Status, Alma saves any changes made to the item in the editor and then toggles the missing status, adding or removing a "missing" process type.If an item is in another process type, this option is disabled, and if an operator adds a process type to an item in place and then selects Save and Toggle Missing Status, only the selected process type will be saved, and the "missing" process type will not be applied.
- RFIDがあり、接続アイコンで示されるアクティブなRFID接続がある場所の場合、RFIDへの書き込みと保存の追加オプションがあります。When you select Write to RFID and Save, the information is written to the Alma database.When the information has successfully been written to the Alma database, the information is saved to the RFID.ピースパラメータに複数のピースが指定されている場合、追加のピースを処理するように求められます。プロンプトの例については、以下を参照してください。For additional information, see RFID Support.
- If you only want to update information in the Alma database, select Save.
